¶ Time and Materials Billing
The BlueCollar T&M (Time & Materials) billing function supports billing customers for actual hours worked (labor), defined daily per diem add-on rates (per diem), the cost of materials used (inventory), as well as any other transaction type defined (transactions).
This is valuable because the rate and markup logic lives in reusable templates rather than being re-keyed on every invoice — once your rules are set, the billing tool reads the time and costs that have already been entered and proposes the correct billing automatically.
¶ Set-up and Dependencies for T&M Billing
The BlueCollar T&M Billing Template stores the pricing rules for Labor, Per Diem, Transactions, and Inventory items. These rules tell NetSuite how to calculate the billing rate or markup for your project costs. This rule-based approach provides:
- Flexibility: You can create multiple T&M Billing Templates to handle different projects, customers, or contract types.
- Rule Stacking: Each template can include many rules—each with its own criteria—so you can handle anything from simple hourly rates to complex vendor- or cost-code-based markups.
¶ Defining Labor Rules
Navigate to BlueCollar > Time & Materials Billing > BlueCollar T&M Billing Template
Note: Billing Classes should be defined prior to creating T&M Billing Templates (BlueCollar > Time & Materials Billing > BlueCollar T&M Billing Class). These are simply logical groups of billing classes.
Tip: Standardization of billing classes and templates will minimize system maintenance and reduce support. However, you may have as many Billing Templates as desired with as many row details as needed to support your business.
¶ Creating a T&M Billing Template
- Click New to create a new T&M Billing Template
- Enter a clear, descriptive Name (e.g., "T&M Default Rules," "Acme T&M Rates")
- Click Save
¶ Adding Labor Details
- Click the Labor sub-tab
- Click New BlueCollar T&M Billing Labor Detail
- Populate the following fields to support your business:
- Name: A clear label (e.g., "Pipe Welder - OT - Shift 2")
- Employee: Select a specific individual or leave blank for "All Employees"
- T&M Billing Class: Choose the role (e.g., "Laborer," "Dozer," "Head of Engineering," "Welding Specialist")
- Earn Code: ST, OT, DT, etc.
- T&M Billing Cost Code (Optional): If hours for certain tasks (e.g., "04500 - Equipment Operation") need unique rates
- Shift: If the rate varies by shift worked
- Billing Rate: The per-hour amount to charge customers
- Use Plugged Rate: Check this when the rule should bill at a rate entered on the individual time entry instead of the fixed Billing Rate above (see Per-Line Rates with Use Plugged Rate)
- Related Service Item: The NetSuite item used on your invoice
- Rule Order: The sequence in which the billing engine applies the rules
- Non-Billable: Check this to exclude matching time entries from billing (see Excluding Costs with Non-Billable Rules)
¶ Per-Line Rates with Use Plugged Rate
Most labor rules apply a single fixed Billing Rate to every time entry they match — ideal for standard, repeatable rate cards. For work where the rate is negotiated per shift, per crew, or per individual and isn't known when the template is built, the Use Plugged Rate option lets each timecard carry its own rate.
When Use Plugged Rate is checked on a labor rule:
- The rule bills at the T&M Billing Rate Override value entered on the individual time entry, rather than the rule's fixed Billing Rate.
- The rule only matches a time entry when an override value has actually been entered. If a matching timecard has no override value, it falls through to the next rule in Rule Order sequence — so you can pair a "Use Plugged Rate" rule (lower Rule Order) with a fixed-rate catch-all (higher Rule Order) to handle both situations from one template.
To use it, enter the negotiated amount in the T&M Billing Rate Override field on the time entry, and the matching plugged-rate rule will carry that amount through to billing.
Note: This is a setup choice that drives how time is matched and priced before it reaches the billing tool. It is separate from the one-time rate or quantity adjustments you can make to a line directly inside the Billing Tool at billing time — both are available, and they work together.
¶ Real-World Examples for Labor Rules
Straight Time vs. Overtime for a Single Billing Class
- Example: "Laborer - ST - Shift 1" at $50/hr (Rule Order 1), and "Laborer - OT - Shift 1" at $75/hr (Rule Order 2)
- NetSuite applies the OT rate whenever the Earn Code is OT
Differentiating Double-Time (DT)
- Example: "Laborer - DT - Shift 1" with a higher rate (e.g., $100/hr)
- This ensures double-time is distinctly billed if hours exceed a threshold or local labor rules require DT
Shift-Based Variation
- Example: "Laborer - ST - Shift 2" at $100/hr, "Laborer - OT - Shift 2" at $150/hr
- This accounts for a second-shift premium on both straight time and overtime
Skilled Roles
- Example: "Head of Engineering - ST" at $500/hr (Rule Order 6)
- This covers specialized labor at a premium rate
Named Employee or Equipment Operators
- Example: "T&M Dozer" at $215/hr for all dozer operations, or a line specifically for "John Smith," if his rate differs from other employees in the same class
Catch-All Rule
- If you need a fallback rate (e.g., "All Employees - ST - Any Shift") to handle hours that don't fit into specialized lines, give it a higher Rule Order number (like 99) so it only applies if no other rule matches
¶ Tips & Best Practices for Labor Rules
- Clear Naming: Label each rule so users immediately know the earn code, shift, and billing class
- Prioritize with Rule Order: The billing engine evaluates rules in sequence, so place the most specific rules first. For example, if Luke has a billing class of "Welder" and there is a rule for "Welder" and another rule for "Welder AND Luke," the second rule should be given a rule order before the first rule. If the first rule of just "Welder" were evaluated first, the second rule would never be triggered since Luke is a Welder and would meet the criteria of the first rule
- Periodic Audits: As pay scales or customer agreements change, revisit these lines to keep them current
- Testing: After adding or editing a rule, enter time for a scenario that should match your new rule, then confirm in the T&M Billing Tool that the correct rate applies
¶ Defining Transaction Rules
Transaction rules control how non-labor costs (bills, journal entries, expense reports, etc.) are marked up for billing to customers.
¶ Adding Transaction Details
- Click the Transactions sub-tab on your T&M Billing Template
- Click New BlueCollar T&M Transaction Detail
- Complete the following rule details:
- Name: Give the rule a descriptive name (e.g., "Journal Entries - 0% Markup")
- Transaction Type: Pick from Bill, Journal, Expense Report, Bill Credit, Labor Resource Cost Journal, etc.
- Entity (Optional): If you want the rule to apply only to a specific vendor or entity, select that here
- Related Cost Code / GL Account (Optional): Narrow the rule to a certain cost code or account
- Cost Item / Billing Item: Indicate the default billing item to show on invoices
- Cost Markup %: Enter the markup (e.g., 0%, 10%). If no markup is desired, enter "0." The Gross Profit % will automatically adjust to show the Gross Profit % that will be earned by the markup defined with this rule
- Gross Profit %: This works hand in hand with Cost Markup % and updating one updates the other. This gives users two ways of describing markups—they can use Cost Markup % to define amounts they will markup costs by OR they can use Gross Profit % to define Gross Profit % that they want to make on this rule which will update the Cost Markup % to achieve this target
- Rule Order: Determine the sequence in which the billing engine applies the rules
- Non-Billable: Check this to exclude matching transactions from billing (see Excluding Costs with Non-Billable Rules)
- Click Save
Billing the Labor Resource Cost Journal: Alongside the standard cost transactions, Labor Resource Cost Journal is available as a Transaction Type. This is the journal BlueCollar produces to post resource labor cost, and selecting it here lets you mark it up (or flag it non-billable) through a transaction rule just like any vendor bill or journal entry.
¶ Real-World Examples for Transaction Rules
Different Journal Entry Markups
- Example: Journal entries that hit the "Payroll Taxes" GL Account get 0% markup, while journal entries against "Project Labor Overhead" get 10%
- Setup Tips:
- Create two separate detail lines, each with Transaction Type = Journal
- For line 1, set GL Account = "Payroll Taxes," Cost Markup % = 0%
- For line 2, set GL Account = "Project Labor Overhead," Cost Markup % = 10%
Vendor-Specific Markups
- Example: Vendor bills from "Acme Concrete" have a 15% markup, while standard vendors remain at 10%
- Setup Tips:
- Create a detail line named "Acme Concrete – 15%"
- Transaction Type = Bill; Entity = "Acme Concrete"
- Cost Markup % = 15%
- A second line ("Default Vendor Bill") can remain at 10%, applied to "Any Entity"
Cost Code-Based Markups
- Example: Site-Setup materials use cost code 01100 and carry a 10% markup, while Concrete (cost code 03300) has a 15% markup
- Setup Tips:
- Create one rule for "Site-Setup" with Related Cost Code = "01100," markup = 10%
- Another rule for "Concrete" with Related Cost Code = "03300," markup = 15%
Combination: GL Account + Specific Cost Code
- Example: Any journal entry posted to GL Account "Construction Materials" AND cost code "03300 – Concrete" gets a special 20% markup
- Setup Tips:
- Add one detail line with:
- Transaction Type = Journal
- GL Account = "Construction Materials"
- Related Cost Code = "03300 – Concrete"
- Cost Markup % = 20%
- Add one detail line with:
Subcontractor Overhead Variation
- Example: Subcontractor bills for HVAC might have 8% markup, while Electrical subcontractor bills are 5%
- Setup Tips:
- For HVAC:
- Transaction Type = Bill
- Entity = Your HVAC vendor's record
- Markup % = 8%
- For Electrical:
- Transaction Type = Bill
- Entity = Your electrical subcontractor's record
- Markup % = 5%
- For HVAC:
¶ Tips & Best Practices for Transaction Rules
- Rule Order Priority: If there's any chance multiple rules could apply (e.g., same vendor, same cost code), set a Rule Order to ensure NetSuite picks the correct markup
- Descriptive Naming: Label each rule with a brief but clear description ("Vendor ABC – 15% Markup")
- Regular Reviews: Markups may change. Periodically revisit your T&M Transaction Detail lines to confirm they reflect current contract needs
- Testing: After creating or updating a rule, test a small transaction to verify the correct markup is applied
¶ Defining Per Diem Rules
Per Diem Rules allow users to define daily charges to be billed to customers per employee, per day. For example, employees may receive per diem of $100/day while working on a project. A typical use case is in the Oil and Gas industry where facilities are in remote locations and employees work during the week and are presumed to be away from home. For each day worked, users could define a rule which would bill $150/day to the customer.
¶ Adding Per Diem Details
- Navigate to the Per Diem subtab on your T&M Billing Template
- Click New BlueCollar T&M Per Diem Detail
- Complete the following fields:
- Name: Enter identification for this rule
- Employee: Specify employee this rule applies to (blank for all)
- T&M Billing Class (Optional): Specify the Billing Class this rule applies to
- BlueCollar Cost Code (Optional): Specify the Cost Code this rule applies to
- Include Non-Working Days:
- If you need to pay a per diem for non-working days, select this option
- Note: The project must have a BlueCollar Work Calendar specified in the project's advanced preferences. If this preference is selected and an employee works the day prior to a non-working day, a T&M Billing line will be generated for the next sequential non-working days from the associated calendar
- Include Holidays:
- If you need to pay a per diem for holidays, select this option
- Note: The project must have a BlueCollar Work Calendar specified in the project's advanced preferences. If this preference is selected and an employee works the day prior to a holiday, a T&M Billing line will be generated for the next sequential holidays from the associated calendar
- Billing Rate: Per diem rate to charge
- Related Service Item: The item that will show on the invoice
- Rule Order: Priority of this per diem rule
- Non-Billable: Check this to exclude matching per diem days from billing (see Excluding Costs with Non-Billable Rules)
Each day an employee works on a project and meets the criteria specified for the rule, a T&M billing line will be created for the highest priority per diem rule with a quantity of 1.
¶ Defining Inventory Rules
Material T&M rules are triggered when inventory is received from a Transfer Order into a location defined as a project location in the BlueCollar Global Preferences. This will add markup or margin % to the transferred inventory and invoice the customer.
¶ Adding Material Details
- Navigate to the Materials subtab on your T&M Billing Template
- Click New BlueCollar T&M Material Detail
- Complete the following fields:
- Name: Enter identification for this rule
- Pricing Method: Select the basis used to calculate the billing amount. Three methods are available:
- Customer Price will use native NetSuite pricing in sequence (Item Specific Pricing > Item Group Pricing > Price Level). If any of this is defined, it would use the customer price vs. a markup. (Cost Markup % and Gross Profit % are disabled with this method.)
- Average Cost uses the item's average cost as the basis, then applies your Cost Markup % or Gross Profit %
- Last Purchase Price uses the item's last purchase price as the basis, then applies your Cost Markup % or Gross Profit %
- Cost Markup %: % of markup on item (will be disabled if Customer Price is selected)
- Gross Profit %: % of gross profit to achieve on the item (will be disabled if Customer Price is selected)
- Billing Item: The item that will show on the invoice
- Transaction Type: Optionally narrow the rule to a specific transaction type
- Rule Order: Priority of this material rule
- Non-Billable: Check this to exclude matching materials from billing (see Excluding Costs with Non-Billable Rules)
¶ Excluding Costs with Non-Billable Rules
All four rule types — Labor, Transaction, Per Diem, and Materials — support a Non-Billable flag. When a non-billable rule matches a cost, that cost is excluded from the Billing Tool entirely rather than being priced and proposed for billing.
This is a clean way to keep internal or pass-through costs out of customer invoices while still letting them flow through the project. Because non-billable rules are evaluated ahead of billable ones, a well-placed non-billable rule reliably carves out the items you never want billed (for example, a specific overhead GL account or an employee class that should never appear on a T&M invoice).
¶ Updating the Employee Record
The following fields should be populated on the Employee Record for any resources logging time:
- BlueCollar Resource Rate Template: To capture estimated labor costs
- BlueCollar T&M Labor Billing Class: Each employee who will enter time needs to have this field populated in order for the system to default their time under that class (to determine bill rate to the customer)
Note: On the time entry screen, there is a Labor Billing Class field; however, it can be left blank as it will default to the employee's Labor Billing Class when the field is left empty. The employee can set the Labor Billing Class if they don't have a default one or if their default one needs to change for the specific time entry they are working on.
¶ Enable Weekly Timesheets
Weekly Timesheets must be enabled in NetSuite (Setup → Enable Features → Employees) — not just basic Time Tracking. Without Weekly Timesheets, time entries will not appear in the T&M Billing Tool.
¶ Processing T&M Billing
Once set-up is complete, time should be recorded using standard NetSuite timecard functionality (or loaded into NetSuite timecards if using an external time capture system).
¶ Fields That Impact T&M Rate Calculation
On the timecard, the following fields impact how the T&M rate is calculated:
- BlueCollar Project
- Class
- Cost Code
- Shift
- T&M Billing Rate Override — the per-line rate used when a matching labor rule has Use Plugged Rate checked (see Per-Line Rates with Use Plugged Rate). Leave it blank to bill at the rule's fixed rate.
¶ Using the Time & Materials Billing Tool
The Billing Tool will review the time entered against the defined rules and auto-generate your invoices for T&M billing.
- Navigate to BlueCollar > Time & Materials Billing > Time & Materials Billing Tool
- Use filters at the top to narrow the list of time entries to review and process
- Review entries
- Make adjustments/overrides to the rate or quantity if needed
- Select all or individual records to process
- Click Bill
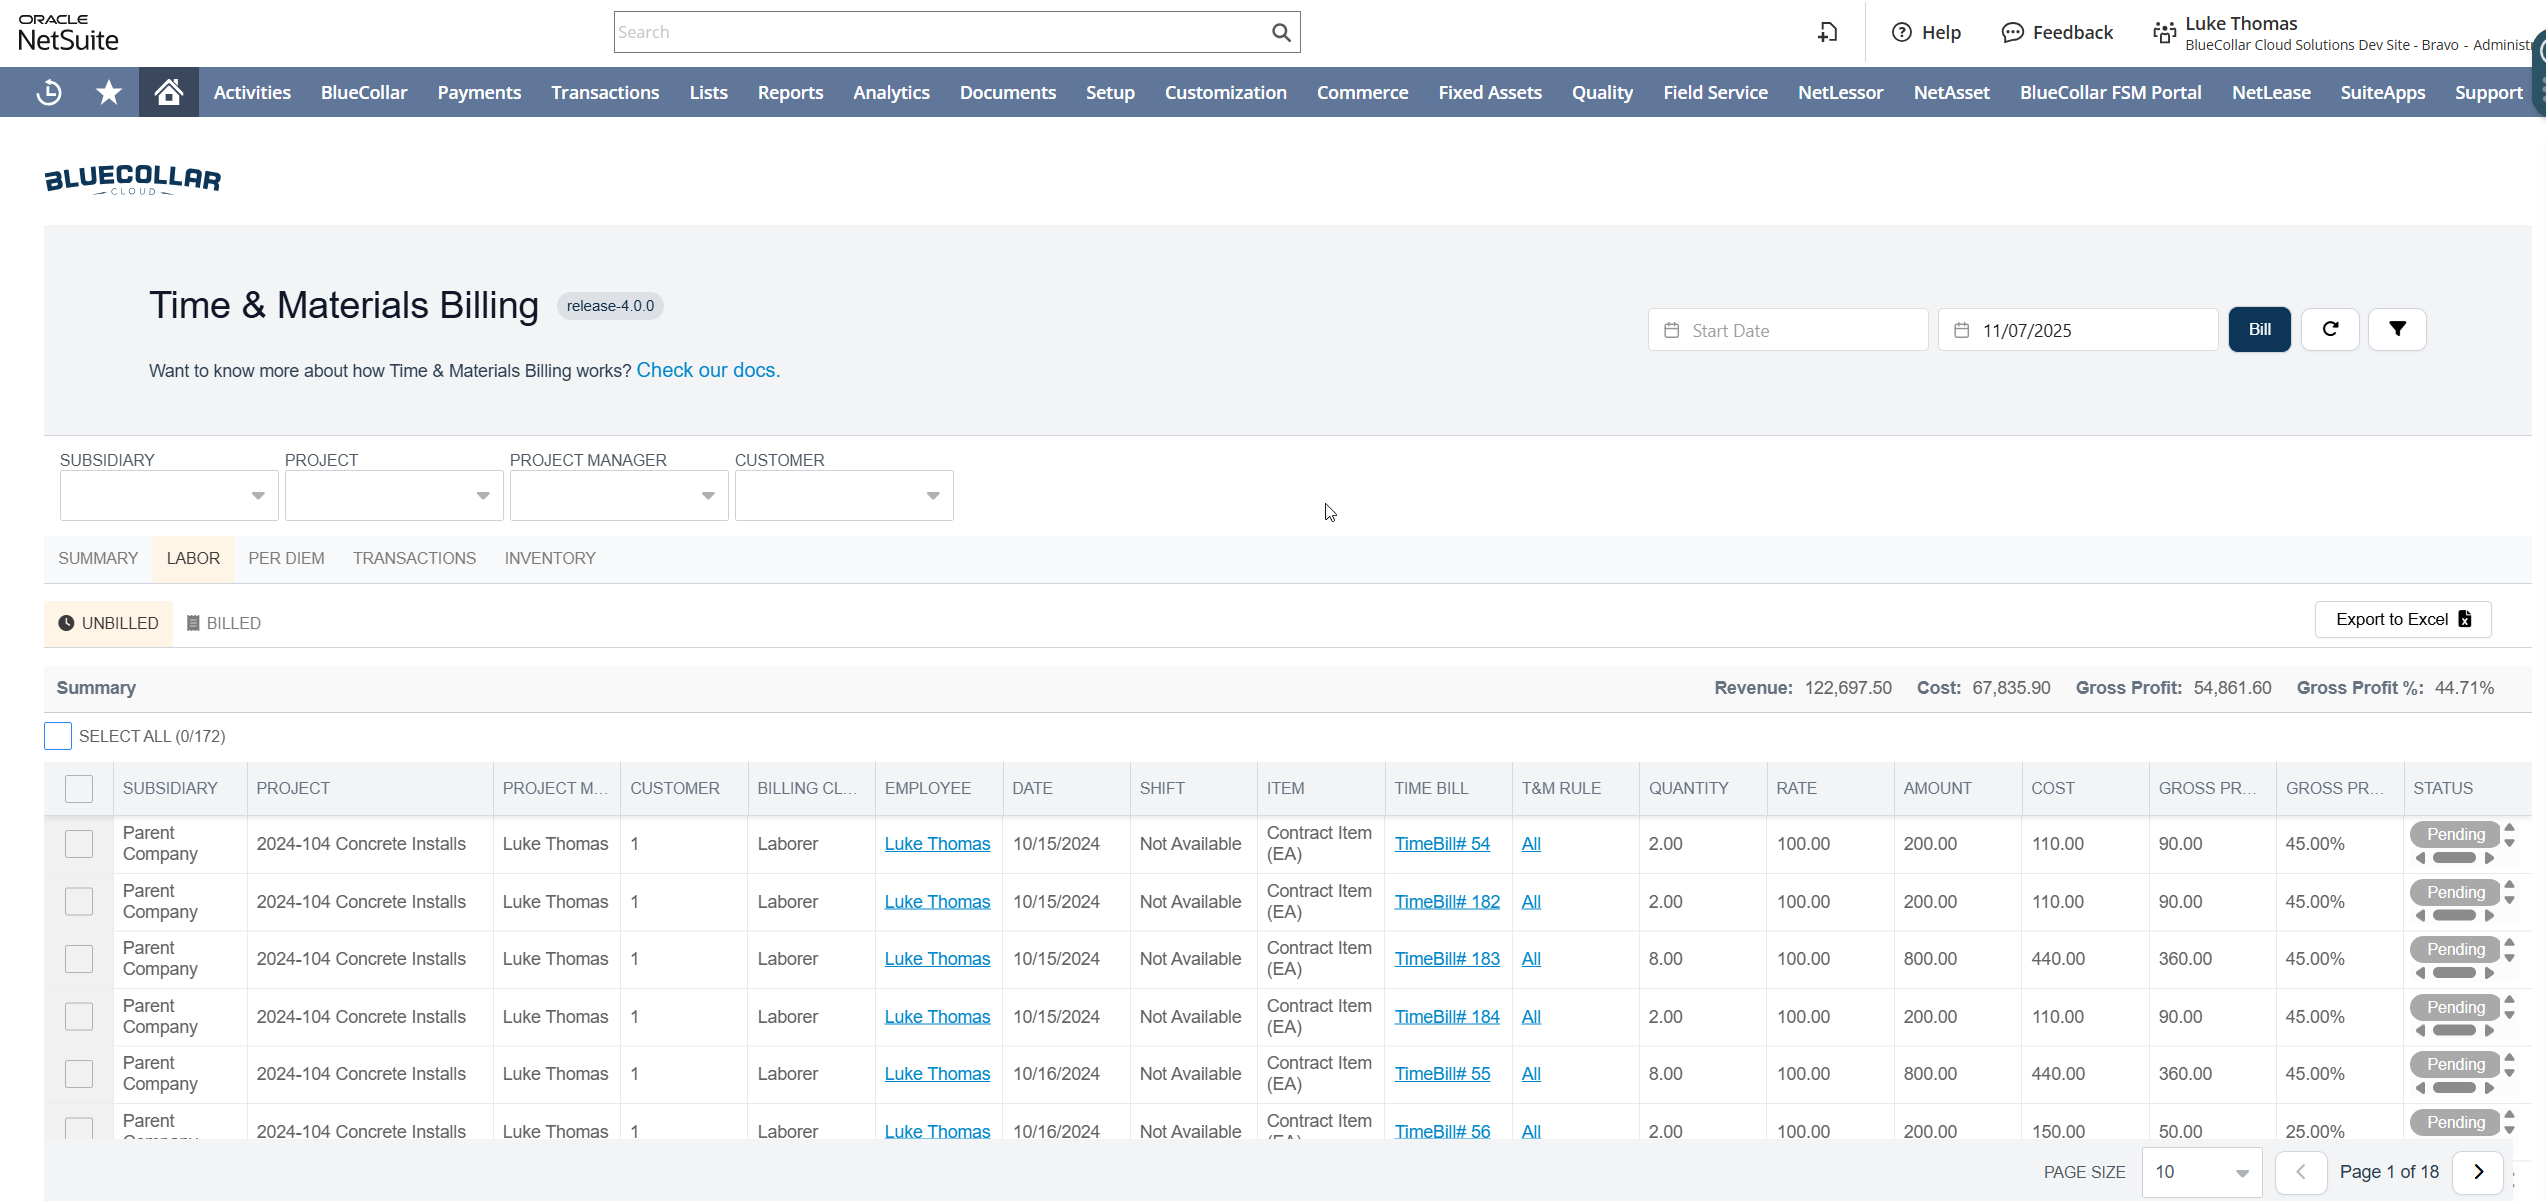
Sorting that sticks: Each grid tab — Labor, Inventory, Transaction, and Per Diem — remembers its own column sort independently. Click a column header to sort a tab, and that order is kept for that tab across reloads without affecting the others, so reviewers can keep each grid arranged the way they prefer.
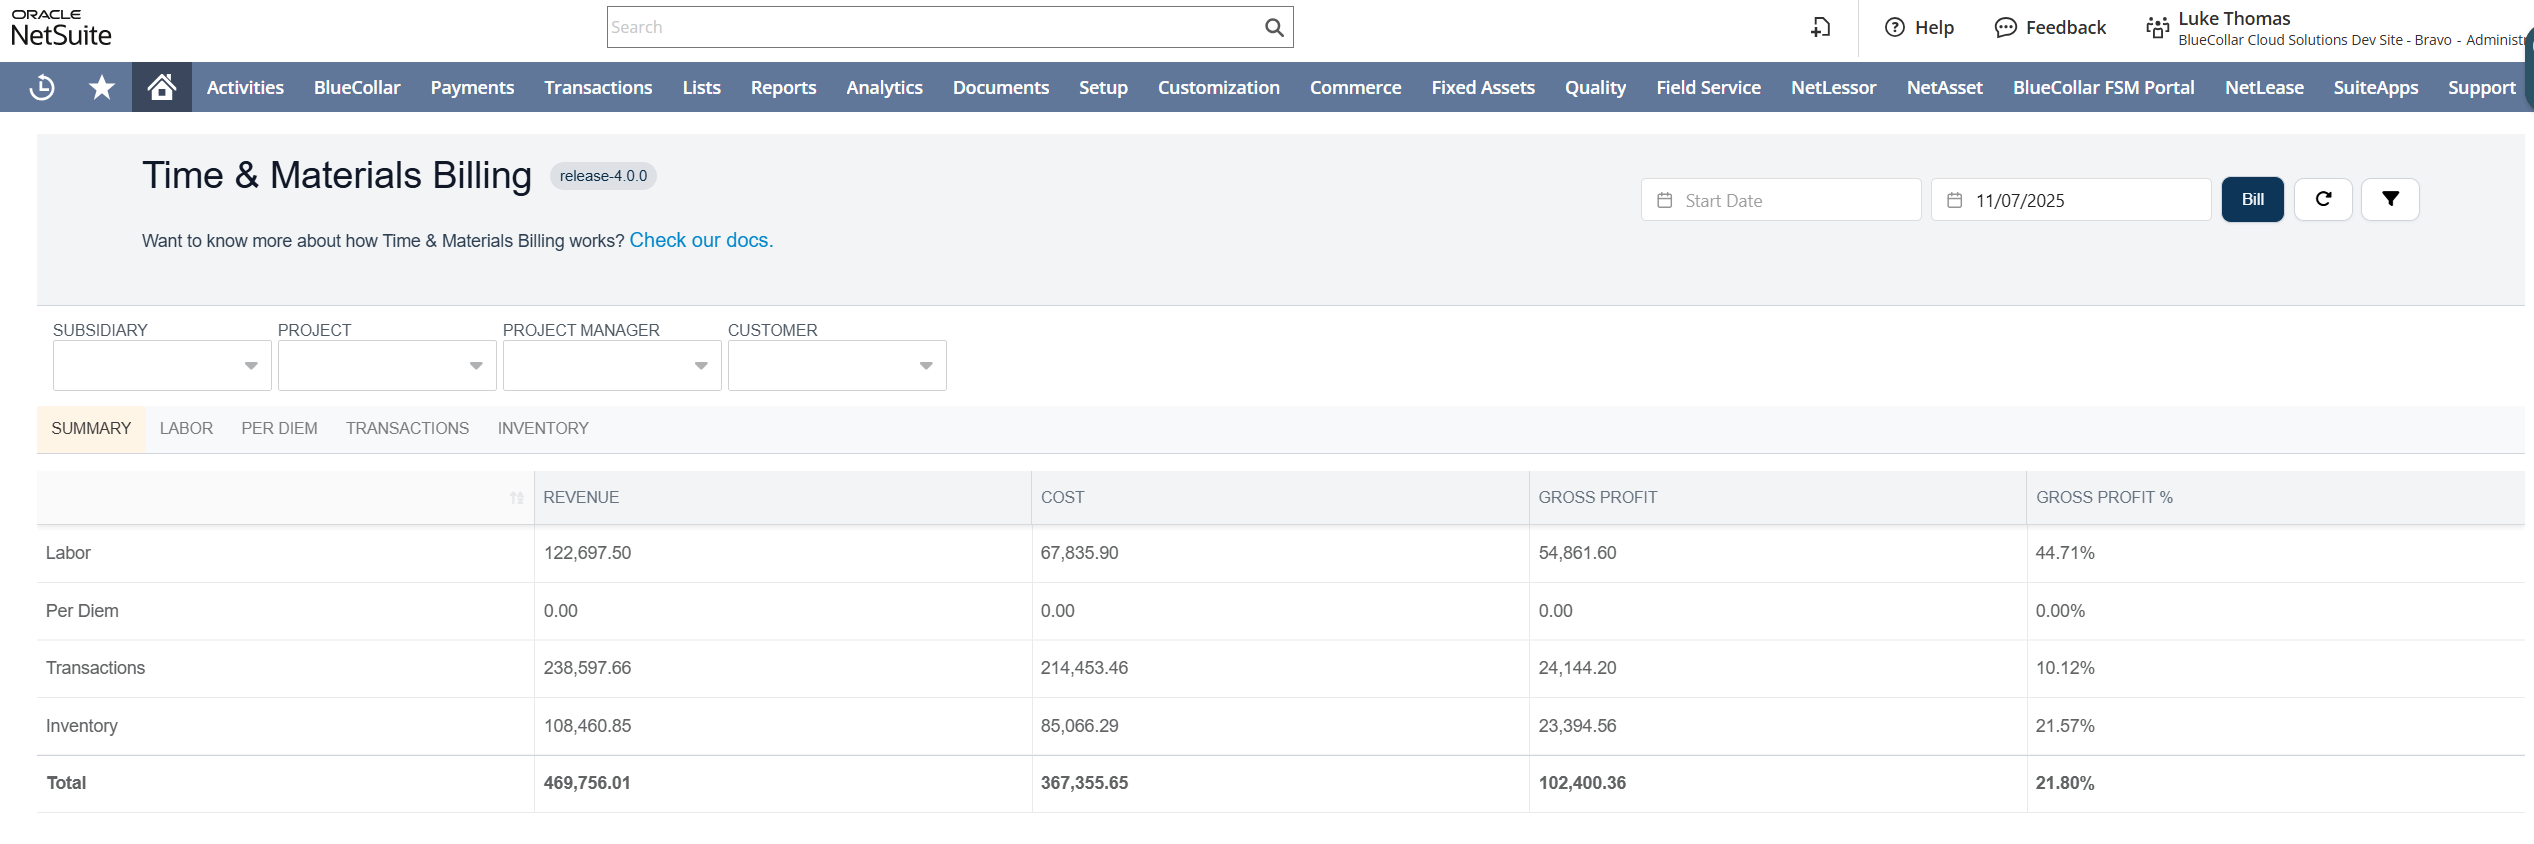
The amounts on the Summary page are totals for everything checked off on all the other tabs.
¶ Troubleshooting
¶ Time entries aren't showing in the T&M Billing Tool
- Enable Weekly Timesheets — basic Time Tracking alone is insufficient (see Enable Weekly Timesheets above).
- Verify the T&M Billing Template is set on the project — the project record must have the T&M Billing Template field populated.
- Check BlueCollar Global Permissions — the
TIME_AND_MATERIALS_BILLING / TIME_AND_MATERIALS_VIEWpermission must be set to VIEW, not FULL. Setting it to FULL paradoxically breaks visibility.
¶ Time entries show but the rate is wrong or rules don't match
- Verify the employee has a Labor Resource Rate Template assigned (and a default T&M Labor Billing Class).
- Ensure the template's rules match what's coded on the time entries (Class, Cost Code, Shift, Earn Code), and check Rule Order — the most specific rules must come first.
- Confirm the Related Service Items on labor rules are Items for Sale, not Items for Purchase — using purchase items throws an error when billing.
¶ Permissions
T&M billing access is controlled through BlueCollar Global Permissions:
| Feature | Application | Action | Level |
|---|---|---|---|
| View the T&M Billing Tool | TIME_AND_MATERIALS_BILLING | TIME_AND_MATERIALS_VIEW | VIEW |
| Process (bill) T&M | TIME_AND_MATERIALS_BILLING | TIME_AND_MATERIALS_FULL | FULL |
¶ Related Topics
- Work Performed — field quantity capture (the other billing input path)
- Labor Resource Costing — costing labor hours (distinct from billing them)
- Inventory and Material Requisitions — material T&M rules and project locations
- Fixed Fee Billing — progress billing for fixed-price work